Overview:
In this lesson, student artists create the armature for their masks.
Students will be able to:
-
turn their drawing into a three dimensional model.
Setup:
Students will be working independently.
Have materials set up in a way that is easy to pass out, see, and select from.
Materials:
-
Drawings from Lesson 1
-
11”x17” Watercolor Paper or very thick Paper
-
Cardboard cut into irregular shapes
-
Tin Foil
-
Miscellaneous recycled materials that are easy to cut, bend, and fold (e.g., empty paper towel tubes, egg cartons, etc.) and miscellaneous materials that might be fun to add (e.g., straws, toothpicks, plastic cutlery, paper cups, etc.)
-
Masking Tape
-
Glue
Media:
- N/A
Handouts & Photocopies:
- L&U.L2.Popups (students can share—this is a reference sheet)
Lesson 2
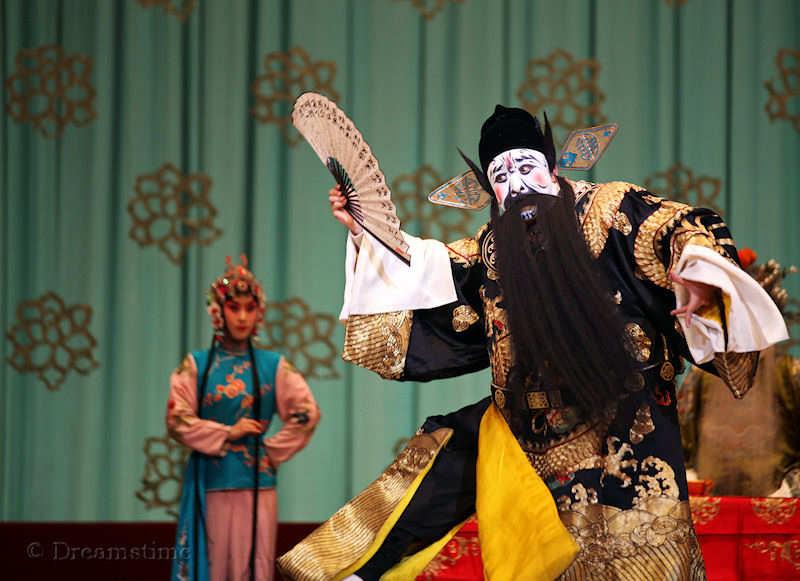
10M, INSPIRATION IMAGE
LOOK AND DISCUSS AN ART PIECE THAT INTRODUCES SOME OF THE LESSON CONCEPTS
Project the inspiration image where students can see it. Give students a moment to study it silently, then begin a brief discussion with the phrase, “What can we find?”. Paraphrase what students say for the benefit of the class, being careful to remain neutral, then ask “What else can we find?”. Alternately, allow them to draw or write what they notice on a blank piece of paper or in a sketchbook.
- China National Peking Opera Company performing the Red Haired Galloping Horse opera at Meilanfang theatre in Beijing, China.
- This is a character in a Chinese Opera. The masks worn in the opera are called kou-lien and are painted on the actors’ face before the show. They are a direct representation of the character’s motivation and inner feelings. The need for makeup masks began in the earlier time periods when plays could only be seen by natural daylight or candlelight. Because of the lighting, it became necessary for the actors’ faces to stand out in order for the audience to be able to understand the character they were watching. As a result, the characters would have eyebrows and mouths painted on to give extra expression to their characters..
Note on using the information above: As your students participate in a conversation around this artwork, it may occasionally be helpful to provide them with additional or contextual information. This information can and should be imparted at the teacher’s discretion.
The point of this discussion time is to have students learn and add onto each other’s thoughts. By remaining neutral and simply repeating what students say you allow students to do the heavy mental lifting and also create an environment where there is no wrong answer, fostering creativity and mental risk-taking.
5M, INTRODUCTION VIDEO
WATCH THE INTRODUCTION VIDEO & CHECK FOR UNDERSTANDING
Check for understanding by asking, “Who was listening closely that can sum up what we are doing today?” Make sure that student artists can list all the steps and clarify anything that needs clarifying.
- Building their drawing. The shapes need to stick up from the mask.
- If a shape is too thin or flat on the mask base, it will not show up when students put plaster over it.
Pass out the worksheet and tell students that these are strategies they can use to make the different objects stick up from their mask—sort of like a pop-up book.
20-25M, WORKTIME
FOCUS ON STUDENT ARTISTS BUILDING MASKS UP
The student artists work independently on their work as the teacher circulates. Foster strong work habits by commenting on student artists who are focused on their work as well as student artists who seem to be pushing themselves to try new things.
As the teacher circulates, s/he should remind students that the features of their mask need to stick up and away from the base of the mask—they should be noticeably three dimensional. Masking tape is often easier to work with at this point. Students should focus on securing their pieces in place, but don’t need to worry about making sure it is permanent or how things look—the strips of plaster will cover most of the gaps and assist in gluing down the pieces.
5-10M, CLEAN-UP/PRESENTATIONS
STUDENTS PRESENT WORKS IN PROGRESS AND DISCUSS THE ARTISTIC DECISIONS THAT THEY MADE
Sharing should work as follows:
- Student stands by their work. A teacher should hold it, or place it on an easel.
- The student presents their work, answering What they made, How they made it, and Why they made the decisions that they did. When they are done they ask, “Any comments or questions?” and can take responses from the audience.
- A note on responses: it is o.k. if an audience member questions or wants clarification from the artist. It is also o.k. if an audience member makes suggestions. But it must be done in a kind, thoughtful, and respectful way.
- Always end the conversation by asking the class to give the artist a compliment.
Depending on the teacher’s style of classroom management, it might be helpful to only choose and train a few kids to clean. The rest of the class can be busy with the presentation. Make sure to train these helpers well in advance so that you aren’t left with a messy room.
Clean-up times will vary with materials; get to know your class and allow 5-10 minutes depending on how efficient they are and whether or not the material was messy.
ANTICIPATED PROBLEMS
- The most common problem in this lesson is for students to glue or tape their pieces directly onto the mask base without making sure they stick up from the base enough. Explain to them that they are basically going to be putting a piece of wet cloth over their whole mask, so if they don’t exaggerate details, they will disappear. Remind them of the different ways they can make a piece pop up. Make a suggestion based on the piece that they are trying to glue down.
EARLY FINISHERS
If a student finishes early, tell them that ceremonies or rituals often have music & dance accompanying them. Have them create music to represent their ritual or ceremony either lyrically or through percussion (light drumming) depending on their preferences.
This project is free to access, but after the first lesson, you will have to create a free account and enroll in the course. After you create an account and enroll, the project can be accessed from the \’artroom\’ tab at the top of the page.