Scientific Sketching
Project: Artist, Explorer, Scientist
Lesson 1
OVERVIEW:
SYNOPSIS
Students learn about how naturalists (scientists who study plants and nature) have used sketchbooks and field-books as a way to explore and closely observe their subjects. Students then create ‘field sketches’ by drawing leaves or other plants.
Note: If it is nice out, this lesson can be extended into a second day. Before watching the video, have students fold and staple paper to make a field notebook. They can use the first page for this lesson, and on the second day go ‘into the field’ and collect leaves, plants, flowers, or sticks that they then practice drawing in their field notebook.
OBJECTIVE
SWBAT practice careful observation skills.
SW understand how to ’sketch’ like a scientist
SET-UP
Students will be working individually, so have materials prepared to go out to tables/or desks depending on how your class is set up. Decide prior to class if you want students to draw on scrap paper or in a notebook, and adjust your time accordingly.
MATERIALS
Copy paper (3-4 pieces per student), pencils, sharpeners, erasers, botanical examples (e.g., flowers, leaves, etc.), scissors
Optional:
- Making a book: Paper for covers (construction paper, or if you have pretty scraps of paper you could use that, too), stapler
- colored pencils (see early finishers)
- Magnifying glasses (for looking at specimens)
PHOTOCOPIES
N/A
MEDIA
N/A
INSPIRATION IMAGE
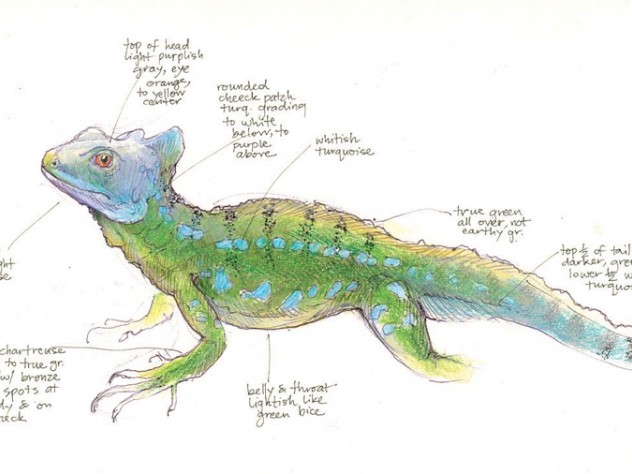
Jenny Keller, BASILISK LIZARD. 2010.
This is a colored-pencil drawing is of a basilisk lizard made from a captive specimen at the California Academy of Sciences.
“The fact is, scientific illustrations can achieve certain things that a photograph cannot,” writes scientific illustrator Jenny Keller. “A good illustration can portray difficult-to-photograph or rarely witnessed events […] Sketches created while in the field can also record valuable information — sometimes even more reliably than photography,” Keller writes.
Note on using the information above: As your students participate in a conversation around this artwork (see ‘Inspiration’ in the lesson plan), it may occasionally be helpful to provide them with additional or contextual information. This information can and should be imparted at the teacher’s discretion.
LESSON 1
| INSPIRATION: 10min.LOOK AND DISCUSS AN ART PIECE THAT INTRODUCES SOME OF THE LESSON CONCEPTS. | Project the inspiration image where students can see it. Give students a moment to *study it silently, then begin a discussion. **The teacher should launch the discussion by asking:1. “What’s going on in this picture?” While a student responds, the teacher should point at the areas under discussion in the artwork, then neutrally repeat what the student said for clarity. S/he should move on to the next student with the question:2. “What more/else can we find?”***If a student needs a little re-direction, or is unclear, the teacher should ask:3. “What do you see what makes you say that?”4. Use the inspiration image description as needed to provide context or enhance discussion. *Alternately, allow them to draw or write what they notice on a blank piece of paper or in a sketchbook.**This discussion is based on ‘Visual Thinking Strategy’, an inquiry-based teaching method that encourages students to use visual evidence and build on one another’s observations to discuss an artwork. In this method of teaching, the teacher acts as facilitator, but should remain neutral as the student’s observations guide the discussion.***The student’s observations should be based on visual evidence–what can be observed within the frame of the artwork |
| INTRODUCTION: 5min.WATCH THE VIDEO INTRODUCTION | Watch Video Lesson Note: Be prepared to pause the video Summary: Field sketches are drawings that scientists make to record their observations when they are doing field research. (examples) Field sketches are typically very detailed pictures of the specimen with the scientist’s thoughts written around it. . It is very important that scientists record what they are looking at correctly. Recording what you see is different from drawing the picture you have in your head. Many of us have cartoon-like images of objects in our head–such as houses, apples, etc.. When wanting to accurately sketch a real object, it’s important to focus on the individual object in front of you, rather than the cartoon image you carry in your head. Students will draw plants.Identify the shapes that make up their plantDraw those shapes, large, so the details aren’t squished. Add the shapes for the smaller, interior componentsGo back in and add detail such as ripped leaves or texture |
| CHECK FOR UNDERSTANDING | Check for understanding by asking, “Who was listening closely that can sum up what we are doing today?” Make sure that student artists can list all the steps and clarify anything that needs clarifying. In particular, make sure they can:• can define ‘field sketch’ • understand the steps of observation drawing:Identify the shapesDraw the major shapesDraw the minor shapesErase unnecessary lines and add details• Pick up a botanical specimen and as a class verbally identify the different shapes that make it up. If there is a whiteboard or chalkboard available, have students do a group drawing (ask one student to draw the main shape, then allow students to take turns adding shapes) |
| WORK TIME: 20-25min.INDEPENDENT | The students work independently on their work as the teacher circulates. Foster strong work habits by commenting on student artists who are focused on their work as well as student artist who seems be pushing themselves to try new things. |
| FOCUS QUESTION: What makes a good scientific sketch? | Help students understand what makes a good scientific sketch by focusing on particularities of an example object – like a leaf with holes in it, or an irregular rock. These particularities are often very important for scientists to record. When walking around, make “I notice” statements about the specific visual information that students have recorded (e.g., I noticed that you included a line to show where the leaf is a bit torn). Optional challenge: If many of the students are drawing the same thing, you can have a “matching game” where students are challenged to match drawing with specimen. |
| CLEAN-UP/ PRESENTATIONS: 5-10 min. STUDENTS DISCUSS THE ARTISTIC DECISIONS THAT THEY MADE USING ‘WHAT, HOW, AND WHY” THEN TAKE COMMENTS OR QUESTIONS. | Depending on the teacher’s style of classroom management, it might be helpful to only choose and train a few kids to clean. The rest of the class can be busy with the presentation. Make sure to train these helpers well in advance so that you aren’t left with a messy room. Clean-up times will vary with materials; get to know your class and allow 5-10 minutes depending on how efficient they are and whether or not the material was messy. Choose presenting student artists in advance and let them know during their work time so that they are prepared. Sharing should work as follows: Student stands in by their work. A teacher should hold it, or place it on an easel. The student presents their work, answering What they made, How they made it, and Why they made the decisions that they did. When they are done they ask “Any comments or questions?” and can take responses from the audience. A note on responses: it is o.k. if a audience member questions or wants clarification from the artist. It is also o.k. if an audience member makes suggestions. But it must be done in a kind, thoughtful, and respectful way.Always end the conversation by asking the class to give the artist a compliment. |
| ANTICIPATED PROBLEMS | If a student is having a hard time getting the shape of their specimen correctly: sit down with them and help them identify the basic shapes of their object. If that doesn’t work, have students put their object on the paper, and place dots around the key points where it chances (for example, when drawing a maple leap, a dot where the leaves point), then draw the lines in betweenIf they are still having trouble, allow them to trace their object to be able to see the outline, but go back in and add details to the middle. |
| EARLY FINISHERS: | Once a student has created their initial observation sketch, they can: choose an area where something unusual is happening & blow it up in a zoom bubbleinclude words/labels. Labels can indicate size, color, texture, etc.; they can include scientific questions about their specimen that start with the words, “I wonder…”; Add color. |